I found I was having this issue due to a bad .plist file.
For outlook, you would go to ~/Library/Containers/com.microsoft.Outlook/Data/Library/Preferences/
In my case, the 'com.microsoft.Outlook.plist' file was unable to be opened by XCode due to an incorrect format. I renamed the file by adding '.old' to the end of it and re-started Outlook.
This re-created a new .plist file.
After going through the welcome screen again, it no longer opens after restarting.
Showing posts with label tech tips. Show all posts
Showing posts with label tech tips. Show all posts
Monday, 2 October 2017
Wednesday, 20 January 2016
Enabling Metric Measurements in Blender

this next setting is in the transform panel which you can pull up by pressing 'n' on the keyboard while in edit mesh mode.

Tuesday, 4 August 2015
Time Machine couldn't complete the backup
on a very rare occasion my Mac at home throws an error regarding backing up to Time Machine Volume which is being served off an Ubuntu server.. I've found in those cases a simple restart of the avahi-daemon (linux service for bonjour) will fix the issue.
issue the following at the linux command prompt.
sudo /etc/init.d/avahi-daemon restart
issue the following at the linux command prompt.
sudo /etc/init.d/avahi-daemon restart
Wednesday, 20 May 2015
How to fix eclipse if the workspace hangs while loading.
occasionally eclipse fails to launch while loading your workspace, simply issue the following command from the terminal.
rm ~/Documents/workspace/.metadata/.lock
Wednesday, 8 April 2015
convert any html file 2 PNG using PhantomJS

Since PhantomJS is using WebKit, a real layout and rendering engine, it can capture a web page as a screenshot. Because PhantomJS can render anything on the web page, it can be used to convert contents not only in HTML and CSS, but also SVG and Canvas.
Beside PNG format, PhantomJS supports JPEG, GIF, and PDF.
phantomjs rasterize.js http://ariya.github.io/svg/tiger.svg tiger.pngTuesday, 21 January 2014
building a cMangos server with bots in a nutshell.
The basic workflow is as follows:
clone cmangos, pull playerbot to merge projects, clone ScriptDev2, then build.
10 steps to get it setup (git addresses may change)
1. git clone git://github.com/cmangos/mangos-classic.git mangos
2. cd mangos
3. git pull https://github.com/blueboy/portalclassic.git (this merges playerbot into cmangos classic)
4. git clone git://github.com/scriptdev2/scriptdev2-classic.git ~/mangos/src/bindings/ScriptDev2
5. create a ‘build’ and ‘run’ folder in mangos folder
6. cd into ‘build’
7. cmake .. -DCMAKE_INSTALL_PREFIX=~/mangos/run -DINCLUDE_BINDINGS_DIR=ScriptDev2
8. make
9. make install
10. Setup Databases according to current site instructions
Sunday, 5 January 2014
Finding out your external IP address on a linux machine that is command line only.
Recently i've been dabbling with VPN services on various computers in my house and I needed to verify if a particular machine was using the VPN IP or not (it's an Raspberry Pi running OpenElec)
first step was SSH'ing to the Pi and then to find out what my IP currently really is.
the easiest way is to use an external service via the command line browser or download tool. Since wget is available on most systems, we can use that.
To find your ip, use:
To find your ip, use:
wget -qO- http://ipecho.net/plain ; echo
Friday, 15 November 2013
Deploying a development iOS app to a small number of internal devices
This doesn't happen often where I work, but once in a blue moon, we need to add a certain functionality to our iPhone app that we need to test internally on a few devices but some of the devices are located in another province thus, we don't have physical access to some of these iOS devices.
how do we go about doing this? I've used a 3rd party called Diawi in the past and it works great as long as you follow a few steps. (there are alternative sites for doing this like testflightapp.com etc)
what is the first thing you need to do? You need to collect the UDID's of ALL the devices you wish to test or adhoc deploy to. The most reliable way to do this is via iTunes. (i've tried UDID retrieval apps in the past however as of iOS7 all of these methods are broken and return bad information. If the UDID returned starts with a a bunch of ffffffffffff's in a row, then you don't have a real UDID and it will only cause you headaches. )
what are the steps to retrieving the UDID's for a particular device?
Step 1. Launch iTunes.
-for-an-iPhone,-iPod-or-iPad-Step-1.jpg)
Step 2. Plug in your iPhone or iPod or iPad

Step 3. Click on the device name in iTunes Menu
-for-an-iPhone,-iPod-or-iPad-Step-3.jpg)
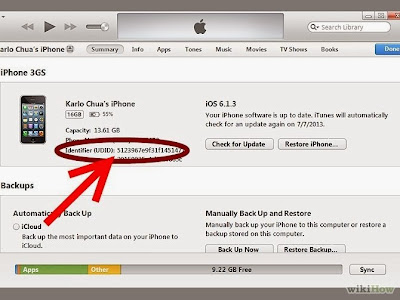
Step 4. Click on "Serial Number" in Summary Menu.
-for-an-iPhone,-iPod-or-iPad-Step-4.jpg)
Step 5. Notice that the Serial Number will change to a long letter and number string called UDID.
-for-an-iPhone,-iPod-or-iPad-Step-5.jpg)
Step 6. Right click on the UDID number and choose "Copy", then paste that UDID number into notepad or an email so we can add it to our developer provision for testing.
-for-an-iPhone,-iPod-or-iPad-Step-6.jpg)
Once you have collected the UDID's that you require for internal testing the next step is to add them to your adhoc or development provisioning profile (example .mobileprovision) on your apple developer profile.
Step 1. Log into the apple developer portal and navigate to "Certificates, Identifiers & Profiles". Click on the Devices 'all' section on the left and it will show you the current list of developers associated to your provision profiles. (Yes this means your development profile as well as your adHoc profiles.)
Click on the + sign at the top right to add new UDID(s)

Step 2. The next page will just ask you to enter a name and the UDID of the device you wish to add. Input the relavent information and then click "continue"
Step 3. Once you've added your additional UDIDs for deployment you then need to look for the 'provisioning profiles' section of the left side bar and click on either Development OR Distribution depending on what kind of app build you plan on using the newly added UDIDs against. For testing internally we do AdHoc distribution builds of our App. But you could technically use a Debug build with the Development profile. Click on the profile you need on the right panel, because just because you've added UDID's to your apple devices list DOES NOT mean they are currently active inside the provision profile.

Step 4. By clicking on the profile you can then see more information about the profile; but, more importantly you can edit the profile to "activate" your newly added UDID's. click "edit".

Step 5. On the edit provision page you can see that Ali and Andrea whom I just added as new UDID's are unchecked and thus not actually allowed to use our development build with this provision file. If you were to send them the .mobileprovision file at this point their iphone's would simply display an error and refuse to install the provisioning file. You need to check these names off in this screen and then hit "Generate" at the bottom of the page to generate a new development provisioning file. Note* you will also have to do the same to the Distribution profile on the left panel if you require them to test against an AdHoc build which requires the use of a distribution profile and not a development one.

After you've generated a new provision, can you simply download it and use it to build your AdHoc version and then submit it to Diawi for your testers to download and try out.
how do we go about doing this? I've used a 3rd party called Diawi in the past and it works great as long as you follow a few steps. (there are alternative sites for doing this like testflightapp.com etc)
what is the first thing you need to do? You need to collect the UDID's of ALL the devices you wish to test or adhoc deploy to. The most reliable way to do this is via iTunes. (i've tried UDID retrieval apps in the past however as of iOS7 all of these methods are broken and return bad information. If the UDID returned starts with a a bunch of ffffffffffff's in a row, then you don't have a real UDID and it will only cause you headaches. )
what are the steps to retrieving the UDID's for a particular device?
Step 1. Launch iTunes.
-for-an-iPhone,-iPod-or-iPad-Step-1.jpg)
Step 2. Plug in your iPhone or iPod or iPad

Step 3. Click on the device name in iTunes Menu
-for-an-iPhone,-iPod-or-iPad-Step-3.jpg)
Step 4. Click on "Serial Number" in Summary Menu.
-for-an-iPhone,-iPod-or-iPad-Step-4.jpg)
Step 5. Notice that the Serial Number will change to a long letter and number string called UDID.
-for-an-iPhone,-iPod-or-iPad-Step-5.jpg)
Step 6. Right click on the UDID number and choose "Copy", then paste that UDID number into notepad or an email so we can add it to our developer provision for testing.
-for-an-iPhone,-iPod-or-iPad-Step-6.jpg)
Once you have collected the UDID's that you require for internal testing the next step is to add them to your adhoc or development provisioning profile (example .mobileprovision) on your apple developer profile.
Step 1. Log into the apple developer portal and navigate to "Certificates, Identifiers & Profiles". Click on the Devices 'all' section on the left and it will show you the current list of developers associated to your provision profiles. (Yes this means your development profile as well as your adHoc profiles.)
Click on the + sign at the top right to add new UDID(s)

Step 2. The next page will just ask you to enter a name and the UDID of the device you wish to add. Input the relavent information and then click "continue"
Step 3. Once you've added your additional UDIDs for deployment you then need to look for the 'provisioning profiles' section of the left side bar and click on either Development OR Distribution depending on what kind of app build you plan on using the newly added UDIDs against. For testing internally we do AdHoc distribution builds of our App. But you could technically use a Debug build with the Development profile. Click on the profile you need on the right panel, because just because you've added UDID's to your apple devices list DOES NOT mean they are currently active inside the provision profile.

Step 4. By clicking on the profile you can then see more information about the profile; but, more importantly you can edit the profile to "activate" your newly added UDID's. click "edit".

Step 5. On the edit provision page you can see that Ali and Andrea whom I just added as new UDID's are unchecked and thus not actually allowed to use our development build with this provision file. If you were to send them the .mobileprovision file at this point their iphone's would simply display an error and refuse to install the provisioning file. You need to check these names off in this screen and then hit "Generate" at the bottom of the page to generate a new development provisioning file. Note* you will also have to do the same to the Distribution profile on the left panel if you require them to test against an AdHoc build which requires the use of a distribution profile and not a development one.

After you've generated a new provision, can you simply download it and use it to build your AdHoc version and then submit it to Diawi for your testers to download and try out.
Friday, 1 November 2013
how to kill XBMC if frozen on AppleTV without Rebooting AppleTV Tethered Jailbrake
I'm currently using a Tethered Jailbrake solution on my AppleTV 2, so rebooting my ATV really sucks since i have to hook up a computer to get it booted again. Every once and a while XBMC crashes in a way that its frozen and in the past i'd have to unplug the AppleTV in order to get out of it.
Turns out there's a much simpler way. All you need to do is SSH into the ATV from any computer and simply type:
$ killall AppleTV
thats it. this command will kill all processes the AppleTV has running (apps) but not actually reboot the device.
Turns out there's a much simpler way. All you need to do is SSH into the ATV from any computer and simply type:
$ killall AppleTV
thats it. this command will kill all processes the AppleTV has running (apps) but not actually reboot the device.
Friday, 6 September 2013
how to change your xcode SDK in Titanium Studio for OSX
so recently i've needed to use the developer preview of xcode 5 to make sure our iOS app is compliant in iOS7 but i couldn't see a way to switch xcode versions within Titanium studio.
turns out you do it from the command line in Terminal.
open up Terminal and type the following:
sudo xcode-select -switch /Applications/Xcode5-DP5.app/Contents/Developer
if you want to revert back to 4.x then just type:
sudo xcode-select -switch /Applications/Xcode.app/Contents/Developer
You will need to restart Titanium Studio after you type either and you will be prompted to change your run configuration when you try to deploy it on the simulator.
Monday, 29 July 2013
How to crack password-protected PDF's
When PDF documents are visible but not printable there's an easy workaround when you are using GNU/Linux. Print the pdf to postscript. I've done this several times successfully.
$ pdftops [nietafdrukbarepdf.pdf] out.ps
you can then take that .ps file into osx and open it directly with illustrator if you need to grab a vector element.
$ pdftops [nietafdrukbarepdf.pdf] out.ps
you can then take that .ps file into osx and open it directly with illustrator if you need to grab a vector element.
Wednesday, 26 June 2013
batch pdf maker from command line
Every once and a while i have about 50 pdf files i need to create from a bunch of .html files i have locally on my machine. Here's a quick and easy way to convert those html files into pdf from the osx command line.
firstly install wkpdf. Its free.
wkpdf is an open-source software project. Its source code is hosted at github.com. For easy installation wkpdf is available as a Ruby gem package from rubygems.org, which means that wkpdf can be easily installed on Mac OS X 10.5.x and later with the RubyGems package manager that comes pre-installed with Mac OS X.
Installing wkpdf requires a recent version of RubyGems. If you don't have installed RubyGems version 1.3.3 or later, you need to update to the latest version with:
sudo gem update --system
Now you are ready to proceed with the installation of wkpdf with the the following command:
sudo gem install wkpdf
After wkpdf has been installed once, you can always update to the latest version with:
gem update wkpdf
for a list of options simply type:
wkpdf --help
but a standard way to use it might look something like this:
wkpdf --source http://www.slashdot.org --print-background yes --no-paginate --output sd.pdf
now that you've got wkpdf installed and working here's a simple for-loop command to process any number of .html files in a folder.
type the following into your terminal window after you've navigated to the folder of html files:
for i in *.html; do wkpdf --source "$i" --print-background yes --no-paginate --output $i.pdf; done
and now you have 50 pdf files that are scaled to the size of each html file and you don't have to worry about acrobat or safari and their pagination issues regarding the default 8.5x11 page size.
Monday, 24 June 2013
Delegate Google Calendars not showing in mountain lion
Okay here's a quick fix for missing delegate calendars in Mountain Lion's iCal.
simply visit this website https://www.google.com/calendar/syncselect and choose the delegates you wish to have syncing and displayed in iCal.
POW.
simply visit this website https://www.google.com/calendar/syncselect and choose the delegates you wish to have syncing and displayed in iCal.
POW.
Wednesday, 27 March 2013
cleaning up messy "open with" menu's in OSX
 If you use your Mac for any period of time, you will find the need to open a document with a different program other than the one set as default. The "Open With" menu appears in the Finder whenever you right-click or control-click on the icon of a document. The "Open With" command is designed to give you a list of alternative choices to handle the file that you've selected, but after long-term use you will find this list can get a little bit messy.
Duplicate entries in your "Open With" menu can be easily cleaned via a simple terminal command, methods that'll work in OS X Mountain Lion. I will also show you how to create a bash script to make it easier to repeat this cleaning whenever needed.
Below you'll find the commands. If you are creating the .bash_profile alias method, remember you will have to quit and relaunch terminal for this to work.
Fix Duplicate "Open With" Terminal:
| 1 |
|
Fix Duplicate "Open With" via Bash alias:
| 1 |
|
Sunday, 3 February 2013
Making a catalog text file of a volume for archival purposes ( archive, storeageset )
navigate to the volume you wish to catalog via the terminal
then enter the following at the command line:
then enter the following at the command line:
find * > volume.txt
Friday, 23 November 2012
Fixing Missing Delegate Calendars in iCal for Mountain Lion
ever since upgrading to Mountain Lion i've recently noticed that all my shared delegate ical Calendars are not showing up or missing and after looking around for answers on the Apple community forums i came up with a fix that worked for me because apparently this is just a bug in iCal
i did the following:
Login to Google Calendar via a web browser (Safari, Chrome, Firefox)
On the left side, locate the calendar you want to add under Other Calendars click on the triangle to the right of it
Select Calendar Settings from the menu
On the Calendar Details page, look towards the bottom for Calendar Address
On that line, go to the right until you find (Calendar ID:ThisWillLookLikeEmail@GoogleOrSomeOtherDomain.com)
Copy just the part after the colon and before the ending parentheses
Paste it into something (Textedit doc, Word, Stickies, whatever)
Copy/paste the following bolded text before the Calendar ID:https://www.google.com/calendar/dav/
Copy/paste or type the following bolded text after the Calendar ID: /user
You will end up with something that looks like:
https://www.google.com/calendar/dav/thiswilllooklikeemail@googleorsomeotherdomai n.com/user
In iCal, select Preferences from the iCal menu
Click on Accounts
Click the + button below the list of Accounts
Give it a description, can be anything you like.
ensure you use the CalDAV type of calendar setting under Account Type
Enter your user name. Note that if it is not a Gmail username, you need to enter the @domain.com part also, critical for Apps for Education or Apps for Business that use their own domain
Enter the password for that account.
Copy/Paste the address you created in the above steps into the Server Address:box
Click Add
The Account Description name will list on the left side of iCal, with a flip down triangle to see the calendar associated with the url entered.
Friday, 14 September 2012
use an HTML file for a signature file in Apple Mail
perhaps you've been wanting to have a scalable html file as your email signature that grows and shrinks as you resize the email in apple Mail under OSX, here's how its done.
1. create your signature using plain html and save it as a .html file somewhere on your local machine.
2. open that html file with safari and save the page as a .webarchive file.
3. create a new signature in apple mail
4. navigate to the following folder on your local machine: ~/Library/Mail/V2/MailData/Signatures/
5. rename your cool html .webarchive file with the name of the newly created blank signature webarchive file and place it into the same signatures folder so that you are overwriting the existing blank signature with your cool HTML one.
6. you're done!
Thursday, 15 March 2012
removing accounts from a filevault2 login screen at bootup
This post is more for IT people dealing with mac's in a corporate environment.. essentially we have a high turnover of sales people at my office and i'm constantly recycling machines but preserving old user accounts for processing and maintaining account / client data.
as soon as you have over 4 or so accounts on a machine i find the encryption fileVault boot screen gets to be a bit crowded and there's really only usually 1 active account at any given time on the machine so whats the best way to hide or remove the accounts from fileVault boot without actually removing the accounts?
Its pretty easy. Just set the accounts passwords to nothing.. The only caviet here is that you can only set a user account password to nothing via the terminal. here's the easy steps.
Step 1: Log in to the account that will not be able to unlock FileVault.
Step 2: Open /Applications/Utilities/Terminal.app
Yes, I know. You hate Terminal. But you have to use it because you can't remove your password via the GUI.
But you can delete it in Terminal. Just type
passwd at the prompt. You will be asked for your "Old Password" (that is, your current password), and then you will be asked for a new password, twice. Enter your current password, then just press the Enter/Return key when asked for a "New Password" and "Retype New Password."
thats all. Next time you reboot those accounts with no password will vanish!
Monday, 13 February 2012
fixing mail problem: The IMAP command “APPEND” (to Sent Messages) failed with server error: Error in IMAP command received by server
I recently discovered an issue with a coworker where her Mail sent folder was automatically generating a single sent mail message over and over and over to the point where there was over a hundred messages of the same message being generated for no explainable reason. Mail kept throwing the following error with each message generation:
The IMAP command “APPEND” (to Sent Messages) failed with server error: Error in IMAP command received by server..
here's the steps i had to follow to fix the issue.
Here are some more detailed ones:
1) Make sure that 'Mail' is fully quit (quit it)
1) Open 'Applications' in 'Finder'
2) Open 'Utilities'
3) Finally double click on 'Terminal'
For the following parts, do exactly as I say...
4) Type: 'cd Library/Mail' then press return (do not type the '
characters on this or following instructions)
5) Type: 'cd IMAP<youremailaddress>@[email address]' nthen
press return
6) Type: 'rm -rf .OfflineCache/' and press return
You can now quit terminal and restart Mail
Sunday, 8 January 2012
how to get link2SD to mount ext2 volumes in android eclair 2.1
this fix is known to work on motorola phones (milestone in my case)
1) Download the ext2.ko file (zip attached)
2) Extract it to your SD card
3) Use Root Explorer to navigate where you extracted it to and copy the file
4) Navigate to /system/lib/modules/ and paste the ext2.ko file there
5) Open an adb shell with super user (su) permissions and run the following command:
Code:
insmod /system/lib/modules/ext2.ko
6) Reboot - Link2SD should now mount the ext2 partition and function correctly!
Subscribe to:
Comments (Atom)