 |
| My Sister and I with the McMillan in 1981 |
In 1971 my Father acquired this McMillan upright piano on a barter for a pair of glasses (he’s a retired Optician now). The piano has remained with the family ever since and I eventually inherited it in 2010 when my father moved out of the city to retire in the country. The piano is approximately 111 years old which, of itself, is really impressive but, I don’t really remember it sounding all that great or anything as a child and growing up. It always seemed to be plagued with tuning issues with some of the keys but good enough for the most part. I wonder how many times it’s been restrung during its life? I can visually see that 1 or 2 strings looks shinier or newer than the rest but I don’t remember my family ever restringing it in the 43 years we’ve owned it.
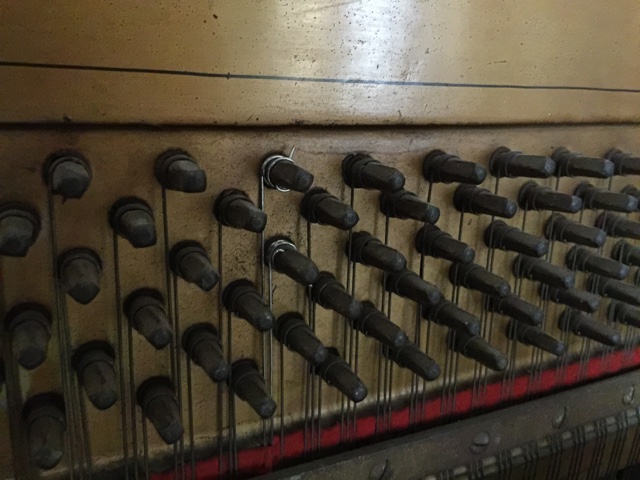 |
| Two shiny strings amidst an ocean of tarnished old strings. |
Fast forward to 2015: My Daughter has turned 6 this year and my wife and I decided we’d like to have a piano teacher come to the house to teach her how to play, so as soon as I’d gotten a nearby teacher secured I figured it was probably a good idea to have a professional tuner come to inspect and tune this thing.

The tuner came by on a friday morning and spent all of 10 minutes adjusting before he stopped altogether and told us the soundboard pins are too old and weak to hold pitch anymore and that if he continued we’d find the piano would be out of tune again by the next day. His recommendation was to junk it, as it would be cheaper to buy a new piano then to even consider rebuilding this existing one. ….great. what are we gonna do about lesson’s now?
Our daughter's piano teacher arrived the following day and we explained the situation. Her recommendation was a hard pill to swallow, she told us that even though the piano was somewhat in tune, it wouldn’t really be recommended for lessons, because its important for a student to develop the proper ear training when learning an instrument, and if the chords aren’t sounding right, its really not helping things. I get it. She recommended we also purchase a new piano and that unfortunately vintage piano’s have essentially zero resale value and we’d be lucky to even give it away, let alone get paid for it. She also said it would cost well over 10 thousand dollars to rebuild the harp and soundboard inside. Jeez.
By the time her lesson was finished I already had a plan brewing as to what exactly i was gonna attempt, I had explained to her that this was a family heirloom and I couldn’t bring myself to dump something I’ve had around me my whole life.. worthless or not. My plan had a lot of fine details that I wasn’t sure would work out yet, but essentially I was gonna gut the piano entirely and convert it to digital.

There were two approaches I was entertaining to achieve this, the first was to see if there was some kind of sensor strip that I can could put under the original keys to convert the key-presses into midi data, the 2nd approach would be to replace the entire keys with a digital set from an 88 key modern electronic keyboard.
I spent a couple hours looking into any method that would allow me to preserve all the stock hardware and action, but basically I came to the conclusion that there are only a handful of digital sensors on the market that met my criteria and the cost of these sensors was much higher then I anticipated (about $1400). Let's skip that approach and check out the other way.
It took me all of 2 minutes to locate an 88 key digital piano on Kijiji for $200. The model was a Yamaha p70 and the reviews looked good enough for me. Within an hour I was back at my house with a new digital Keyboard and ready to gut this thing. Let's do this!
Step 1: the Gutting.

As I peer inside this thing I'm looking for the screws that hold this thing all together, surprisingly there are few.

I'm thinking eventually i'll rip the entire soundboard and harp out of this piano, so that its essentially nothing but an empty shell. Right now this piano weighs a rediculous amount, once all this hardware is out it will probably weigh the same as a generic bookshelf.. Pretty handy in the event we move one day.

Surprise, the further and deeper i go into the beast I discover a long lost pencil that my mother and grandfather likely used decades ago when they used to practice together. I can see how it might have rolled off the top ledge and found its way into this place.. maybe thats why one of the keys was a little sticky when you pressed it?

So far i've only needed to take out 4 screws to get to this point. Remarkable design for something so sturdy. Its pretty cool to see how the piano action works with it all exposed like this. My wife decided to casually remind me that people have died in the past from piano strings breaking. I'm not worried though....

I have no idea what type of wood these keys are made of but they are remarkably light, They also come out of the piano really easy with just a light lift.

A baker's dozen.

I've been taking out the keys in groupings that I can tape up and store away somewhere. maybe real ivory will be worth billions one day.


All the keys are out and now its time to figure out the best way to remove this keybed. It looks like the harp is actually attached to the back of the keybed which means i may have to resort to drastic measures at this point since I don't plan on removing the harp at this stage of the game.

Okay so I ended up just sawing 4 joints which attached the keybed to the incredibly heavy harp. The damage is done, and there's no real going back now.. I mean, I think I possibly could reverse the damage if I really had to, but I don't think i'll be going back to its original state ever at this point.

At this stage it was time to just loosely see what I can do with this Yamaha P70

Hilarious.. The P70 fit perfectly on the shelf, If I didn't care so much about preserving a more authentic look of the upright I could have essentially considered the project complete at this stage, but I knew I wanted to go further with it so my next step was to read up on how best to dismantle this P70 and see if I could just put the keys alone into the spot where the old keys were.
Step 2: the Gutting.. again
It was time to rip apart this perfectly working keyboard... what could go wrong really? I decided to do a search on youtube about it and I found two particularly useful videos that helped me fully understand what was involved in ripping out the keys.
Armed with this newly found wisdom I was able to confidently dismantle this wonderful Yamaha keyboard and it went off without a hitch.

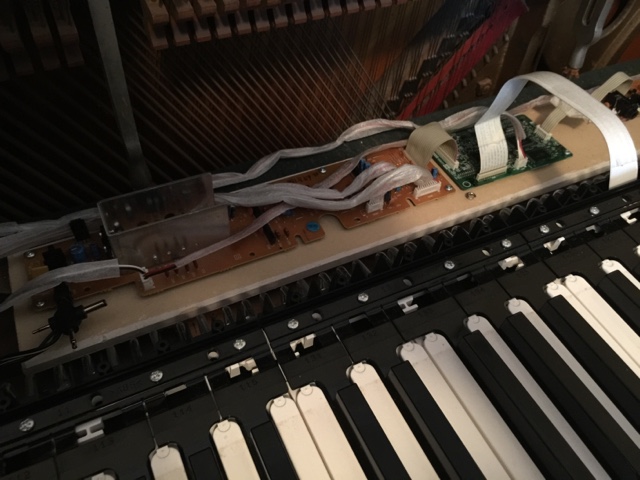
At this stage I've managed to roughly place the motherboard, power supply and other controls into an approximate spot behind wehre the keys will be placed. I'm planning on mounting them properly on a separate piece of wood using proper spacers, but this will do for now.

I decided to wire everything back up and make sure the damn thing still worked. guess what? It did. PHFEWFF, thankfully i've assembled my share of computers in the past so this really wasn't any more difficult than that. Its just a smaller motherboard and a few peripherals right. Actually the hardest part of the entire thing is working with ribbon cables.. I absolutely despise ribbon cables because they are often fragile and you never know if something terrible is about to happen as you pull or push them into their slots, however, compared to the ribbon cables involved in replacing and iphone screen these ones are HUGE. They are also very strong, so don't worry so much k?

So the problem i'm going to have to deal with ultimately is that the keys and their digital mechanism take up about an extra half inch of height vs the original low-profile keys.. this is not really a problem in terms of playability as most piano's and piano stools are all built different and mostly adjustable. It is a problem however for my original front face panel which used roll down over the keys if you wanted. There is just no way I can chop off half an inch from it, nor do I really want to. I'd like to preserve the original pieces JUST in case I change my mind in the future or something.
I know that at this point i'm going to have to cut 2 pieces of wood in order to make this look natural.

The first piece i cut was a shim to go underneath the front lip of the piano to give it its more natural key height look. I'll stain it to match as best I can. I almost thought about cutting a whole new piece of wood for the front lip, but there was a few ornate things i'd lose, so i figured a half inch shim would be good enough.

In this photo you can also see that my keys are just a few millimeters or so off level, again i'm doubtful any piano player would notice, but this has to do with the design of the digital keys and the type of enclosure they were meant to be mounted into. I suppose I could have raised the front a little more to level it, but at this point i'm not bothering. It plays pretty nice as is.


Now that I knew everything was working properly and sounding great, it was time to circle back around and clean up my work. I mounted all the various PCB circuit boards and motherboard onto 1 piece of scrap wood i had lying around. I used some metal grommets as spacers just to ensure there is airflow beneath all these circuit boards (i have no idea if they get hot or anything)
Power supply mounted without issue.

finally done with the mounting.

next up was getting some new wood for the front face, which i would have to stain. I picked this piece of shelving pine from home depot for 8 dollars.

I cut the panel with an old table saw I have which has a missing guide.. My dad suggested over facetime that I could just clamp a level onto any table saw and instantly have a guide. it worked flawlessly.

The new front panel fit perfectly and it was getting exciting now to see it all coming back together keeping its original feel.

Next step was staining.

I decided to go with minwax stain, I've used it in the past and really liked the way it comes out. I'm also planning on sealing it with a minwax wipe-on poly clear coat. I'm skeptical that it will match the original piano... ESPECIALLY the satin finish, but regardless i think it will be decent enough.

I ended up settling with about 5 coats of wipe-on poly clear coat, its not as smooth looking as the rest of the piano, but its close enough. The color of the stain ended up being slightly less red then I’d hoped also but once again, when you see it in context it looks good enough.

One of the last steps was to get that nice red felt strip added to the bottom of the front panel. I opted for just simple dollar store felt which came in 8.5x11 inch sheets. I cut the pages into the strips i needed and used double sided tape to adhere it to the bottom of the panel.

All thats really left to do is to install a small cover for the left side of the keys which currently is where i have all the controls wired for power and voicing options.

In conclusion, i'd say that a project like this is really not as daunting as it seems, it took me only about 2 days (plus a few days waiting for stain to dry) to complete. anyone wanting to save an old piano that would be cost prohibitive to rebuild should definitely consider doing something like this. It really only came down to cutting 2 pieces of wood and a couple of ribbon cables..
I nor my wife are piano players, but here's a sample
I have been playing piano for last three years. From my experience I think the digital piano is better then a grand piano. The Casio brands digital pianos are awesome.
ReplyDeleteExperiencing something so fabulous has a modifying power for the heart and psyche.
ReplyDeleteeCTD
I am thankful to you for sharing this plethora of useful information. I found this resource utmost beneficial for me. Thanks a lot for hard work. moonlight sonata
ReplyDeleteThe blog has a to a great degree limit center that augments, shockingly into extensive variety of concerns.
ReplyDeletealesis recital pro
Wow! Such an amazing and helpful post this is. I really really love it. It's so good and so awesome. I am just amazed. I hope that you continue to do your work like this in the future also https://rightpiano.com/
ReplyDeleteThis comment has been removed by the author.
ReplyDeleteOh wow! This is really helpful. Due to some "help" from a well-meaning relative, the upright piano that my grandmother, mother and I all learned to play on was irreparably damaged (the cast iron harp is cracked). I was heartbroken at the thought of my daughters not learning to play on my piano. This looks like a compromise I could live with. Thank you for sharing your experience.
ReplyDeleteRegular visits listed here are the easiest method to appreciate your energy, which is why why I am going to the website everyday, searching for new, interesting info. Many, thank you!
ReplyDeleteYamaha digital piano